| × | 1 | ||||
| × | 1 | ||||
| × | 1 |
Navindu Arduino

Wednesday, February 10, 2021
Friday, January 29, 2021
 Arduino uno board
Arduino mega
Arduino Nano
board details
What is Arduino?
Arduino is an open-source electronics platform based on easy-to-use hardware and software. Arduino boards are able to read inputs - light on a sensor, a finger on a button, or a Twitter message - and turn it into an output - activating a motor, turning on an LED, publishing something online. You can tell your board what to do by sending a set of instructions to the microcontroller on the board. To do so you use the Arduino programming language (based on Wiring), and the Arduino Software (IDE), based on Processing.
Over the years Arduino has been the brain of thousands of projects, from everyday objects to complex scientific instruments. A worldwide community of makers - students, hobbyists, artists, programmers, and professionals - has gathered around this open-source platform, their contributions have added up to an incredible amount of accessible knowledge that can be of great help to novices and experts alike.
Arduino was born at the Ivrea Interaction Design Institute as an easy tool for fast prototyping, aimed at students without a background in electronics and programming. As soon as it reached a wider community, the Arduino board started changing to adapt to new needs and challenges, differentiating its offer from simple 8-bit boards to products for IoT applications, wearable, 3D printing, and embedded environments. All Arduino boards are completely open-source, empowering users to build them independently and eventually adapt them to their particular needs. The software, too, is open-source, and it is growing through the contributions of users worldwide.
Why Arduino?
Thanks to its simple and accessible user experience, Arduino has been used in thousands of different projects and applications. The Arduino software is easy-to-use for beginners, yet flexible enough for advanced users. It runs on Mac, Windows, and Linux. Teachers and students use it to build low cost scientific instruments, to prove chemistry and physics principles, or to get started with programming and robotics. Designers and architects build interactive prototypes, musicians and artists use it for installations and to experiment with new musical instruments. Makers, of course, use it to build many of the projects exhibited at the Maker Faire, for example. Arduino is a key tool to learn new things. Anyone - children, hobbyists, artists, programmers - can start tinkering just following the step by step instructions of a kit, or sharing ideas online with other members of the Arduino community.
There are many other microcontrollers and microcontroller platforms available for physical computing. Parallax Basic Stamp, Netmedia's BX-24, Phidgets, MIT's Handyboard, and many others offer similar functionality. All of these tools take the messy details of microcontroller programming and wrap it up in an easy-to-use package. Arduino also simplifies the process of working with microcontrollers, but it offers some advantage for teachers, students, and interested amateurs over other systems:
- Inexpensive - Arduino boards are relatively inexpensive compared to other microcontroller platforms. The least expensive version of the Arduino module can be assembled by hand, and even the pre-assembled Arduino modules cost less than $50
- Cross-platform - The Arduino Software (IDE) runs on Windows, Macintosh OSX, and Linux operating systems. Most microcontroller systems are limited to Windows.
- Simple, clear programming environment - The Arduino Software (IDE) is easy-to-use for beginners, yet flexible enough for advanced users to take advantage of as well. For teachers, it's conveniently based on the Processing programming environment, so students learning to program in that environment will be familiar with how the Arduino IDE works.
- Open source and extensible software - The Arduino software is published as open source tools, available for extension by experienced programmers. The language can be expanded through C++ libraries, and people wanting to understand the technical details can make the leap from Arduino to the AVR C programming language on which it's based. Similarly, you can add AVR-C code directly into your Arduino programs if you want to.
- Open source and extensible hardware - The plans of the Arduino boards are published under a Creative Commons license, so experienced circuit designers can make their own version of the module, extending it and improving it. Even relatively inexperienced users can build the breadboard version of the module in order to understand how it works and save money.
How do I use Arduino?
See the getting started guide. If you are looking for inspiration you can find a great variety of Tutorials on Arduino Project Hub.
The text of the Arduino getting started guide is licensed under a Creative Commons Attribution-ShareAlike 3.0 License. Code samples in the guide are released into the public domain.

PIR Motion Sensor: How to Use PIRs w/ Arduino & Raspberry Pi © GPL3+
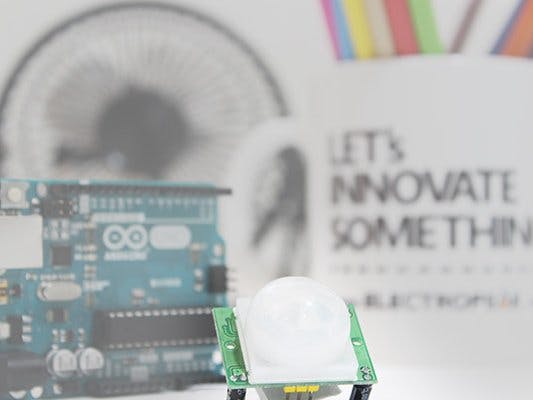
Learn how to use a PIR motion sensor to detect movement. You will also learn how PIR motion sensors work and how to use them.
- 74,027 VIEWS
- 0 COMMENTS
- 39 RESPECTS
COMPONENTS AND SUPPLIES
ABOUT THIS PROJECT
You can read this and other amazing tutorials on ElectroPeak's official website
How PIR Motion Sensors WorkPassive Infra Red sensors can detect movement of objects that radiate IR light (like human bodies). Therefore, using these sensors to detect human movement or occupancy in security systems is very common. Initial setup and calibration of these sensors takes about 10 to 60 seconds.
The HC-SR501’s infrared imaging sensor is an efficient, inexpensive and adjustable module for detecting motion in the environment. The small size and physical design of this module allow you to easily use it in your project.
The output of PIR motion detection sensor can be connected directly to one of the Arduino (or any microcontroller) digital pins. If any motion is detected by the sensor, this pin value will be set to “1”. The two potentiometers on the board allow you to adjust the sensitivity and delay time after detecting a movement.
PIR modules have a passive infrared sensor that detects the occupancy and movement from the infrared radiated from human body. You can use this module in security systems, smart lighting systems, automation, etc. There are different PIR modules available in the market, but all of them are basically the same. They all have at least a Vcc pin, GND pin, and digital output. In some of these modules, there is a ball like a lens on the sensor that improves the viewing angle.
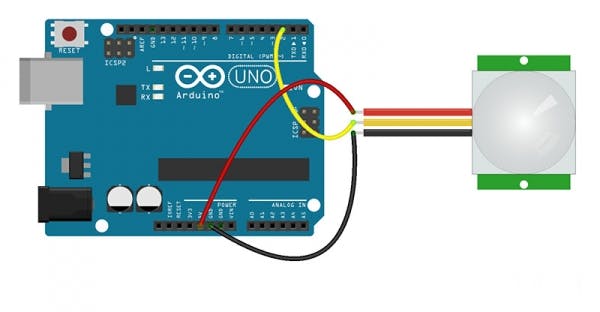
Using a PIR Sensor with ArduinoCircuit
You can connect PIR output to any digital pin.
There is a jumper behind this module. If you move the jumper to L position, the sensor will ‘toggle’ (change state) whenever motion is detected. This is unlikely to be of much use in a practical applications. This mode is called non-triggering or Single Triggering mode.
Moving the jumper to the H position will result in the more usual sensor logic. The sensor will turn on when motion is detected and turn off a while after the last motion is detected. This sensor will reset the timer (which would otherwise turn the output off) each time motion is detected; this would be applicable, for example, for room occupancy lighting control where you don’t want the lights to blink off while the unit resets. This is called Retriggering mode. (or repeatable trigger mode).
There are also two potentiometers behind this module. By changing the SENSITIVITY potentiometer, you can reduce or increase the sensitivity of the sensor (clockwise increase), and also by changing TIME potentiometer the output delay after movement detection will be changed.
Code
You must add the library and then upload the code. If it is the first time you run an Arduino board, Just follow these steps:
- Go to www.arduino.cc/en/Main/Software and download the software of your OS. Install the IDE software as instructed.
- Run the Arduino IDE and clear the text editor and copy the following code in the text editor.
- Choose the board in tools and boards, then select your Arduino Board.
- Connect the Arduino to your PC and set the COM port in tools and port.
- Press the Upload (Arrow sign) button.
- You are all set!
/*
PIR HCSR501
modified on 5 Feb 2019
by Saeed Hosseini @ ElectroPeak
https://electropeak.com/learn/guides/
*/
int ledPin = 13;                // LED
int pirPin = 2;                 // PIR Out pin
int pirStat = 0;                   // PIR status
void setup() {
 pinMode(ledPin, OUTPUT);
 pinMode(pirPin, INPUT);
 Serial.begin(9600);
}
void loop(){
 pirStat = digitalRead(pirPin);
 if (pirStat == HIGH) {            // if motion detected
   digitalWrite(ledPin, HIGH);  // turn LED ON
   Serial.println("Hey I got you!!!");
 }
 else {
   digitalWrite(ledPin, LOW); // turn LED OFF if we have no motion
 }
}
For proper calibration, there should not be any movement in front of the PIR sensor for up to 15 seconds (until pin 13 is turned off). After this period, the sensor has a snapshot of its viewing area and it can detect movements. When the PIR sensor detects a movement, the output will be HIGH, otherwise, it will be LOW.
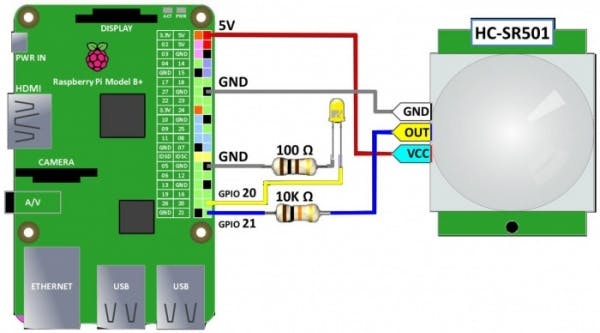
Using a PIR Sensor with Raspberry PiCircuit
Code
import sys
sys.path.append('/home/pi/Adafruit-Raspberry-Pi-Python-Code/Adafruit_CharLCD')
from Adafruit_CharLCD import Adafruit_CharLCD
lcd=Adafruit_CharLCD()     # instantiate LCD Display
lcd.clear()
from time import sleep
import RPi.GPIO as GPIO
GPIO.setmode(GPIO.BCM)     # set up BCM GPIO numbering
# Set up input pin
GPIO.setup(21, GPIO.IN, pull_up_down=GPIO.PUD_DOWN)
# Set up LED output
GPIO.setup(20, GPIO.OUT)
# Callback function to run when motion detected
def motionSensor(channel):
   lcd.clear()
   GPIO.output(20, GPIO.LOW)
   if GPIO.input(21):     # True = Rising
       global counter
       counter += 1
       lcd.message('Motion Detected\n{0}'.format(counter))
       GPIO.output(20, GPIO.HIGH)
# add event listener on pin 21
GPIO.add_event_detect(21, GPIO.BOTH, callback=motionSensor, bouncetime=300)
counter = 0
try:
   while True:
       sleep(1)         # wait 1 second
finally:                   # run on exit
   GPIO.cleanup()         # clean up
   print "All cleaned up."
Arduino CodeArduino
/*

PIR HCSR501

modified on 5 Feb 2019
by Saeed Hosseini @ ElectroPeak
https://electropeak.com/learn/guides/

*/

int ledPin = 13;                // LED
int pirPin = 2;                 // PIR Out pin
int pirStat = 0;                   // PIR status

void setup() {
  pinMode(ledPin, OUTPUT);
  pinMode(pirPin, INPUT);

  Serial.begin(9600);
}

void loop(){

  pirStat = digitalRead(pirPin);

  if (pirStat == HIGH) {            // if motion detected
    digitalWrite(ledPin, HIGH);  // turn LED ON
    Serial.println("Hey I got you!!!");

  }
  else {
    digitalWrite(ledPin, LOW); // turn LED OFF if we have no motion

  }
}
/*
PIR HCSR501
modified on 5 Feb 2019
by Saeed Hosseini @ ElectroPeak
https://electropeak.com/learn/guides/
*/
int ledPin = 13; // LED
int pirPin = 2; // PIR Out pin
int pirStat = 0; // PIR status
void setup() {
pinMode(ledPin, OUTPUT);
pinMode(pirPin, INPUT);
Serial.begin(9600);
}
void loop(){
pirStat = digitalRead(pirPin);
if (pirStat == HIGH) { // if motion detected
digitalWrite(ledPin, HIGH); // turn LED ON
Serial.println("Hey I got you!!!");
}
else {
digitalWrite(ledPin, LOW); // turn LED OFF if we have no motion
}
}My Flame Sensor

-
ASTRONOMY PROGRAM My name is Navindu Jayawardene . I like to apply to MEGHA FORCE .I'm interested in astronomy I read astronomy book a...
-
PIR Motion Sensor: How to Use PIRs w/ Arduino & Raspberry Pi © GPL3+ Learn how to use a PIR motion sensor to detect movement. You wil...
-
Arduino Bluetooth Project Let’s Start Building The circuit is so simple and small, there are only a few connections to be made Arduino Pins...
_f6ucGPuaDx.jpg?auto=compress%2Cformat&w=680&h=510&fit=max)
_nYXUc5buTZ.jpg?auto=compress%2Cformat&w=680&h=510&fit=max)


